
The purpose of the Visual3D report is to verify that all data has been processed correctly.
The Visual3D user interface consists of several tabs:
It is best practice to use the following tabs when reviewing for data quality:
To review the Visual3D report, select the Reports tab:

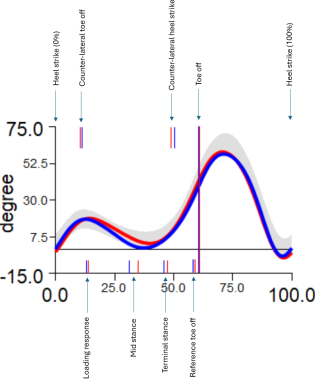
Each line represents one gait cycle, time-normalised to 0 to 100%. For parameters that are related to the left body side, the left gait cycle is used. Accordingly, the right gait cycle is used for parameters related to the right body side.
The band in the background represents mean and ±1 standard deviation from the mean of normative data stored at Root\Template\ .
Comparison plots show means curves:
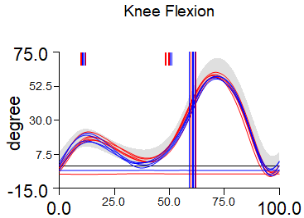
Consistency plots show curves for all trials, so they are useful when verifying data quality:
Notes about the presentation of the plots in Visual3D:
In the following example, an event has been miss-identified. This must be rectified before finalising the report (see “Modifying events in Visual3D”).

The typical sequence of gait events looks like this for labs with two or more force plates (note: the order of left and right may change depending on the placement of the force plates):

For labs with a single force plate, only the left or right foot should make contact with the force plate in each trial:

The following tables presents the sequence of events for a left and right gait cycle:
| # | Label | Description | Left Stride | Right Stride | ||
|---|---|---|---|---|---|---|
| RTO | [removed in event mode "multiple force plates"] | |||||
| 1 | RHS / RON | Right Heel Strike* / Right foot ON FP |
|
|||
| RLR | Right loading response | |||||
| 2 | LTO | Left Toe Off | ||||
| RMS | Right mid-stance | |||||
| RTS | Right terminal stance | |||||
| 3 | LHS / LON | Left Heel Strike* / Left foot ON FP |
|
|||
| LLR | Left loading response | |||||
| 4 | RTO / ROFF | Right Toe Off / Right foot OFF FP | ||||
| LMS | Left mid-stance | |||||
| LTS | Left terminal stance | |||||
| 5 | RHS | Right Heel Strike* |
|
|||
| 6 | LTO / LOFF | Left Toe Off / Left foot OFF FP | ||||
| 7 | LHS | Left Heel Strike* |
|
|||
| 8 | RTO | Right Toe Off | ||||
| RHS | [removed in event mode "multiple force plates"] |
*Note that LHS/RHS stands for "heel strike" for historical reasons. It is more appropriate to use the term "foot strike" or "initial contact", and the event should be placed at the time of the first contact between foot and ground regardless of which part of the foot makes contact with the ground.
Loading response is defined as first peak on vertical GRF.
Mid-stance is defined as zero crossing of anterior-posterior GRF.
Terminal stance is defined as last peak on vertical GRF.
To modify events in Visual3D, go to the

Use the file selector to choose the file you want to review:

Click the Add events icon to add missing events:
![]()
Click the Edit events icon to modify existing events:
![]()
In the Edit Events dialog, use the << and >> buttons to move existing events, Delete label to delete an event and Commit Changes when done.

When you are finished, click the

Save the workspace in Visual3D to make sure the changes will also appear in the Word
Note: GRF graphs seen in report are not part of Recalc pipeline therefore changes to force assignment will not take an effect on the graphs.
If multiple force plates event mode is selected, it is possible to delete force plates with invalid contacts directly in QTM. To do so, open trial in QTM, click on F icon (Calculate forces) and then uncheck force plate with bad contact. When processing data you will be prompted to specify a trial with good contact, which will be used for foot contacts pattern recognition.

It is possible to exclude a certain cycle by adding "IGNORE" event in QTM. Cycle that includes this event will not be shown in Visual3D report.
If event mode is set to 'Instrumented treadmill' it is possible to exclude part the measurement by adding "IGNORE_START" and "IGNORE_END" events. All cycles between those two events will be omitted in Visual3D report.
Whenever Visual3D detects that a body segment is making contact with a force plate, the force vector is shown in blue instead of red. It is important to make sure that the assignments are correct, because wrong force assignments result in invalid kinetic results.
The following screenshot shows an example for an incorrect force assignment where Visual3Dmiss-identified which foot made contact with the second force plate:

To correct this, select the affected trial with the file selector in the
Select Force > View/Edit force assignments and modify the assignment as required.

The Visual3D report template is stored at Templates\*.rgt. To use custom report template, correct template name must be set in Templates\settings.php.
To avoid pipeline processing warnings some commands need to be removed from the Recalc pipeline before saving the custom report template. To do so, open custom template in Visual3D, (1) open Pipeline Workshop, (2) click CMO recalc pipeline and (3) remove all commands below last Compute_Model_Based_Data command. Then save the report template.
